
Derniers tests et previews

PREVIEW The Rogue Prince of Persia : du fun le temps de quelques runs
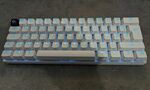
TEST du Logitech Pro X 60 : petit clavier, possibilités infinies

TEST AndaSeat Fnatic : le siège premium pour les pro gamers... ou pas.

PREVIEW Stellar Blade : une folie à venir sur PS5
Dernières actualités

RUMEUR : une exclu consoles PlayStation bientôt portée sur Xbox ?

BON PLAN : Cyberpunk 2077 dans son Édition Ultime en promo

Turtle Beach dévoile 5 casques, souris et clavier pour gamers

Crime Boss: Rockay City, une grosse mise à jour 8.0 avec un tas de changements

bootable
Emunand en V11 et sysnand en V12 le tout bootable sur sx os
Une derniere question, quel est l'interet de passer sur atmosphere si je dois booter avec à chaque fois avec TegraRcmGUI ?
Par contre la je suis un peu trop a la ramasse trop une quiche sous linux.
Si le super administrateur linuxien pouvait passer par la histoire de voir.
1. Open Gparted
2. Erase all partitions from SDcard
3. Click on Device menu
4. Click on Create Partition Table
5. Choose GPT partition type, and click ok.
6. Create Partitions
1. Hos data(>2GB) Partition Name:hos_data Type: Fat32
2. EMUNAND (32GB) Partition Name:emunand Type: Fat32
3. vendor (1.06GB) Partition Name:vendor Type: ext4
4. system (2.17GB) Partition Name: system Type: ext4
5. boot (70.0MB) Partition Name: boot Type:Unformatted
6. recovery (70.0MB) Partition Name:recovery Type: Unformatted
7. dtb (30.0MB) Partition Name: dtb Type: Unformatted
8. userdata(As big as you want) Partition Name: userdata Type: ext4
9. linux_root(As big as you want) Partition Name:linux Type: ext4
10. Swap Space(8GB, optional) Partition Name:linux_swap type: linux_swap
11. Shared space between lakka, android, and linux
7. Apply changes
8. download kosmos, lakka, android(16GB image will work), and l4t-ubuntu.
9. extract Kosmos and lakka to partition 1.
10. extract android image from GZ.
11. type into terminal: sudo kpartx -v -a android.img(rename to match the extracted img file)
12. type into terminal mount /dev/loop0p1 /mnt
13. Copy all data from /mnt to hos_data partition
15. recreate android boot.scr using this configuration(Save as android.txt)
setenv bootargs 'log_buf_len=4M access=m2 androidboot.bootreason=recovery androidboot.hardware=icosa androidboot.console=ttyGS0 console=tty0 androidboot.selinux=permissive fbcon=primary:0 androidboot.serialno='${serialno}
if gpio input 190; then
part start mmc 1 <partition number of boot image> aistart
part size mmc 1 <partition number of boot image> aisize
else
part start mmc 1 <partition number of recovery image> aistart
part size mmc 1 <partition number of recovery image> aisize
fi
mmc read 0x98000000 ${aistart} ${aisize}
boota 0x98000000
16. Build android boot.scr with mkimage(Included with u-boot, needs to be compiled)
mkimage -A arm -T script -O linux -d android.txt android_boot.scr
17. Replace boot.scr in switchroot android folder with the copy you just created Make sure to rename it to boot.scr.
18. use dd to copy android data to partitions. sdcard can be mmcblk0p or sdX<number> It differs depending on the computer.
dd if=/dev/loop0p2 of=/dev/<sdcard>3 bs=256M
dd if=/dev/loop0p3 of=/dev/<sdcard>4 bs=256M
dd if=/dev/loop0p4 of=/dev/<sdcard>5 bs=256M
dd if=/dev/loop0p5 of=/dev/<sdcard>6 bs=256M
dd if=/dev/loop0p6 of=/dev/<sdcard>7 bs=256M
19.(Optional) We are skipping userdata folder: If you want to copy userdata from a pre-setup card, then you will need to mount both SD cards userdata partitions, and use cp -pr /path/to/existing/userdata /path/to/new/userdata
20. Mount linux root from image and linux root partition on new sdcard.
21. Copy data from one to the other using cp -rp /path/to/linux/root/data /path/to/new/linux/root
22. edit /path/to/new/linux/root/etc/fstab
so change: /dev/root / ext4
to: /dev/mmcblk0p<# of linux root> / ext4
22. save.
23. Copy data off partition 1 of linux image to hos_data partition on new SDcard.
23. Create Linux boot.scr using script below.
load mmc 1:1 0x8d000000 l4t-ubuntu/tegra210-icosa.dtb
load mmc 1:1 0x92000000 l4t-ubuntu/initramfs
setenv bootargs 'root=/dev/mmcblk0p<number of linux root> rw rootwait relative_sleep_states=1 access=m2 console=tty0 firmware_class.path=/lib/firmware/ fbcon=primary:1'
usb reset
booti 0x83000000 0x92000000 0x8d000000
24. Save as linux_boot.txt
25. Build linux boot.scr with mkimage(Included with u-boot, needs to be compiled)
mkimage -A arm -T script -O linux -d linux_boot.txt linux_boot.scr
26. Replace hos_data/l4t-ubuntu/boot.scr with our linux_boot.scr
27. Unmount all partitions that have been mounted on new sdcard(Very Important)
28. Create hybrid MBR: Now that we have the data on the partitions, we need to create a hybrid mbr so we can boot to do this, we need to use gdisk.
gdisk /dev/<path to sdcard> sdX or mmcblk0
29. once in gdisk:
1. Hit r and enter
2. hit h and enter
3. Enter partitions to include in MBR seperated by spaces.
if you used my partition layout it would be: 1 2
4. say N to good for grub question.
5. set MBR hex code for both partitions to EE, and dont set bootable flag.
6. once it returns to recovery/transformation command prompt hit o to verify the mbr.
7. If everything looks good, type wq to save and quit.
30. Now place the SDcard in the switch, and boot hekate. Create emunand partition, and enable. If you have done everything correctly, it should boot l4t-ubuntu, Lakka Switch, Switchroot_Android, and Atmosphere with emunand.
Merci pour le petit topo roukxwel
Et pour l'instant le cfw.booter et autres homebrews sont dépendants de l'exploit browser.
Il y a quand même haxchi, qui permet de remplacer un jeu NDS virtual console par homebrew launcher. Mais je n'ai pas testé et ne saurai dire si l'exploit reste installé et les homebrews utilisables. ce petit dr kawashima offert il y a longtemps sur l'eshop attendait peut être cela
Et enfin noel approche, la scene est dejà bien chaude depuis quelques semaines
Et oui, une maj imminente ne serait pas étonnante, et obligatoire pour le prochain zelda (d'ailleurs si on a désactivé les fonctions en veille, elle ne va pas la faire pendant notre sommeil normalement?)
-Tout a fait pour le moment je n'est qu'a peine toucher ma N3DS depuis son achat en prévision des manip a venir
-Non pour le moment je n'ai rien tenter concernant les *Hax.
-Cependant, je m'y suis renseigner un peu ( pour le moment je n'ai que survoler par manque de temps ), si y a pas eu de changement (ou retard d'update) depuis, d'apres le GitHub du homebrew launcher, les *Hax possible qui s'offre a moi son :
-BrowserHax :
- Smashbroshax:
- Oot3dhax :
- NinjaHax:
-Menuhax :
Concernant les tutos je pense pouvoir les trouver ou pense en avoir trouver mais je préfère pas directement me lancer tête la première dans de possible bêtise sans quelque conseil de "vétéran" on va dire ^^
9)
Edit1: my bad , j ai sans doute oublier qu il faut une version précédente a la mienne pour le faire x)
sa na rien avoir avec se que je veut de faire une clé usb Windows To Go
Car je souhaite moi aussi changer mon DD, ce retour d'expérience montre que HDDhackr est capricieux comme vous dites.
J'ai un PC portable. J'espérais télécharger HDDhackr sur une clé bootable, et faire la manip depuis mon PC portable en y insérant le futur disque de la xbox (western Digital)
Avant de me lancer dans l'achat du disque, je dois vérifier que mon BIOS permet de régler mon port SATA en IDE ??
Toutes les cartes mères ne sont pas compatibles avec HDDhackr ?
Merci
C'était déjà le cas à l'époque de Vista OEM acheté avec une machine jusqu'à quelques temps avant la sortie de Windows 7. Microsoft offrait l'upgrade par enregistrement de la machine (via un soft, ou saisie de la clé Vista il me semble). Tu pouvais ensuite télécharger un petit EXE pour upgrader depuis Windows Vista, ou l'ISO depuis le site. MS a d'ailleur créé à l'époque un soft encore utilisé aujourd'hui pour préparer une clé USB bootable avec cet ISO.
Aujourd'hui je ne vois pas pourquoi ce serait différent. En tout cas il est inutile de se soucier plus que ça.